
 “What is all this stuff?”
 “My feet are cold!”
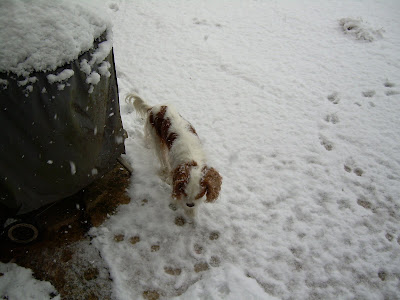 “Hmm, I don’t think there will be any grilling tonight!”

“What is all this stuff?”
“My feet are cold!”
“Hmm, I don’t think there will be any grilling tonight!”


 Oh, these were sooooo good! Master Chow said, “this tastes like restaurant food!” Then he asked me to put it on the “repeat list.”
One of my top two favorite cooking magazines is Cuisine at Home (the other is Fine Cooking). This recipe is from their April 2003 issue, and I tried it because I had a frozen piece of salmon that I wanted to use up, and I was desperate to prepare it in a new way. I decided upon this winning recipe, and tweaked it a bit by cutting down on the sugar called for in the dressing, and leaving out some of the herbs in the salad. Next time, I’m going to try it with canned salmon and see how that works.
Salmon Cakes with Asian Salad
Adapted from a recipe in Cuisine at Home, April 2003
Asian Vinaigrette
Whisk together and chill:
1/4 cup fresh lime juice
3 T. vegetable oil (I used grapeseed oil)
2 T. low-sodium soy sauce
1 T. sugar
2 t. toasted sesame oil
1 t. fresh ginger, grated
1 t. crushed red pepper flakes

For the salmon cakes, combine:
1 lb. salmon, poached, chilled, and flaked
2 cups panko bread crumbs
1/3 cup scallions, minced
1/4 cup chopped fresh cilantro
Poaching salmon: poach in enough water to cover the fish. Add some salt and a few lemon slices to the water, which help keep the flesh firm. Heat until you just start to see bubbles, then add the fish. You do NOT want this to boil or bubble a lot – it should be a gentle simmer. Cook until you can flake the fish, or about 6-10 minutes per pound. It may take a bit longer, so keep an eye on it!
Whisk together, and add to the salmon cake mixture:
4 eggs
3 T. fresh lime juice
3 T. low-sodium soy sauce
2 T. rice vinegar (seasoned rice vinegar has sugar in it, unseasoned does not – use what you have and adjust the rest of the sugar accordingly to suit your taste)
2 T. fresh ginger, minced
2 T. jalapeno, seeded and minced
1 T. sugar
1 t. kosher salt

Once you have mixed all the salmon cake ingredients together, form them into patties, coat with the following, then chill for at least one hour (this is important – chilling the cakes firms them up and makes them easier to handle when you fry them):
1 cup panko crumbs
1/4 cup sesame seeds
Fry cakes in vegetable oil until golden brown. Some suggestions: (1) use a non-stick pan, (2) use a clear vegetable oil, not olive oil, to preserve the taste of the fish, (3) use a fork to place the salmon cakes in the pan to keep from knocking off too much of the coating, (4) handle the cakes gently, or they will fall apart, and (5) do not overcrowd the pan.

For the salad:
10-16 oz. greens, cleaned and spun dry. Toss with vinaigrette and plate. Top with two salmon cakes, and drizzle with more vinaigrette.
Makes 12 cakes, 6 servings.
 Above, a photo of one of my favorite meals, bar none!
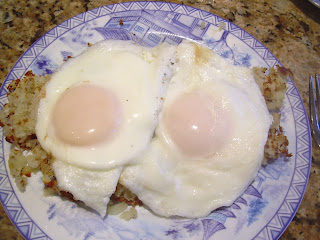
If I were rescued after being stuck on a desert island, my first meal would probably be hash(ed) brown potatoes and two eggs, with runny yolks. Oh, yum.About 30 years ago, my mum found a recipe for hash browns in a woman’s magazine, probably McCall’s, but I don’t recall for sure. I remember making them with her at that time, and the recipe included lots of sour cream and melted cheddar cheese. Ah, the memories, and the metabolism of a teenager. But I digress.
One of the things I have used from that recipe over the years, is this quick and easy way to make hash browns. No shredding raw potatoes. No squeezing the liquid out as you wring the spuds in a towel. No, siree. Are you ready? Here goes:
Step One:
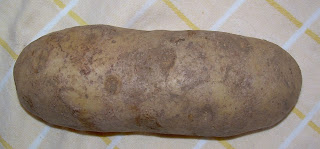
Start with a starchy potato, such as a russet, like this one.
2. Step 2
Bake it. Then, ideally, refrigerate it overnight. You can even bake it in the microwave, but I prefer the oven.
3. Step 3
Put a pan, preferably NOT non-stick (I use my cast iron skillet), over medium high heat. Add some olive oil. Obviously, the more olive oil, the more delicious the end result, but Master Chow and I do try to watch our waistlines, so I tend to be careful. Most of the time.
4. Step 4
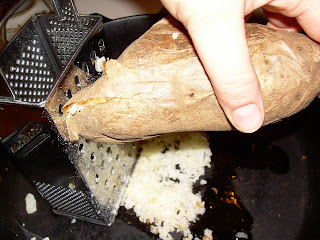
Using a box grater, grate the potato directly into the pan. If you like, remove the skin beforehand, but I find that as I grate the potato, the skin falls off and I just pluck it out of the pan.
 5. Step 5
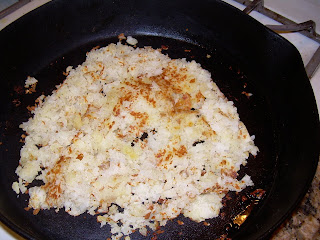
After you’ve finished grating the potatoes, spread them in the pan, season them with salt, pepper, and a bit more olive oil. Spread them out in the pan again, and then leave them alone! Let the potatoes cook for a few minutes, lower or increase the heat if necessary. Flip the potatoes over when they have formed a nice crust on the underside. This is not an omelette, and the whole thing won’t flip over in one piece. Just flip bits over, piece by piece. At this point, I start to cook the eggs. Gastronomic delight is just around the corner!
 6. Step 6
Eat!

One of my favorite cookbook authors is Alice Medrich. I credit her, back in the 1980s, to with awakening me to the marvel of truly fine chocolate. I was a graduate student in the Bay Area, and one day I decided to walk into one of her Cocolat chocolate shops. I bought a white chocolate champagne truffle, and popped the whole thing into my mouth. If your tongue can have an orgasm, mine did at that time. I had never tasted anything like it. Every once in a while after that I would treat myself to some goodie, whatever I could afford on an extremely tight budget.When I moved from Hawaii to the east coast a few years ago, I lovingly packed her book, Cocolat: Extraordinary Chocolate Desserts
Imagine my pleasure a few months ago, when I discovered Ms. Medrich’s lovely new book,Pure Dessert
As I was preparing for the holidays, I discovered an alarming amount of chocolate that I needed to use up, as some of it was starting to bloom (that went into cookies). What better way to use up chocolate than to make . . . chocolates? And take a new cookbook for a test run? I doubled the batch (I don’t recommend this, but I had a lot of chocolate, cream, and mint to use up). I did not have citron vodka, so I used Stolichnaya regular vodka and added a few drops of lemon oil to it.
The result? Delicious. I served them at a Christmas party, and people loved them, even Master Chow, who prefers white chocolate. I keep the chocolates in the freezer, and serve them ice cold. The vodka and faint mint and citrus flavors make the little morsels just go “poof” in your mouth when you bite into them. Medrich’s instructions were clear, simple, and exhaustive (I’m going to summarize my adaptations below).
I can hardly wait to try other recipes in her new book!
Iced Citron Vodka Chocolates with Fresh Mint
Adapted from a recipe by Alice Medrich in Pure Dessert
1/2 cup coarsely chopped fresh mint
1 cup plus 2-3 extra Tablespoons heavy cream
9 ounces semisweet or bittersweet chocolate, marked 55% to 60% cacao (I used Scharffen Berger)
2 Tablespoons vodka, plus 3-5 drops of lemon oil
12-16 ounces bittersweet or semisweet chocolate, chopped, for dippingEquipment:
An 8-inch square baking pan
Instant read thermometer
Baking sheet
Foil
Wax paper
Make the mint infusion:
Combine the cream and mint in a small bowl, cover, and refrigerate overnight. I let mine sit for three days and it was fine.
Strain the cream using a strainer over a glass measuring cup, pressing the leaves to get all the cream out. Discard the mint, and add additional cream to make one cup.
Line the bottom and sides of the baking pan with foil.
Make the ganache:
Chop the 9 ounces of chocolate into small pieces, no bigger than almonds, and set aside in a medium bowl.
Bring the cream to a low boil. Pour over the chocolate and gently stir with rubber spatula, until the chocolate is melted, and the mixture is completely smooth. Do not splash, or whisk or stir too briskly, or the ganache will have a grainy and cakey texture. Stir in the vodka and mix just enough to blend. Strain the ganache into the baking pan, level, and freeze until hard.
Line a large baking pan with wax paper. Cover a large cutting board with parchment paper. Using the edges of the foil, lift the slab of frozen ganache out of the pan, and flip it over onto the cutting board. Peel the foil off.
Using a large chef’s knife dipped in hot water, cut the ganache into 6 or seven equal strips, taking care not to cut through the parchment paper, and working quickly to prevent the ganache from melting . Cut the strips into squares. Transfer the squares into the prepared pan, and cover it with plastic wrap.
Keep the squares frozen until ready to dip the chocolates.
Dip the chocolates:
To dip the chocolates, cover a sheet pan with parchment. Melt the chocolate for dipping over a double boiler of barely simmering water. When the chocolate is thoroughly melted, cool it to 100 to 105 degrees F. Working with small amounts of the squares at a time (keep the others in the freezer until you need them), dip them in the chocolate, using a fork, and wipe the tines of the fork against the edge of the bowl to drain excess chocolate back into the bowl. Don’t let the chocolates sit too long on the fork, or they will stick. If you like, using the dipping fork, drizzle the dipped chocolates randomly to create patterns on their surface.
Refrigerate or freeze the chocolates in covered containers. They keep for up to 2 weeks in the refrigerator, or 3 months in the freezer. Note: the chocolates must be refrigerated, or they will bloom, as the chocolate shell is not tempered. They also taste terrific that way!
 A Sea of Chocolate Heaven
These cookies accomplished a number of things: (1) they helped me clean out my pantry of an alarming amount of chocolate that I needed to use up; (2) they kept me interested in Christmas baking; and, (3) they put me into a chocolate coma. Can life get much better than that?
I am so glad I followed Dorie’s instructions and used premium chocolate (the white chocolate chips that I used were Nestle, but I didn’t skimp on the other chocolates). I used a combination of Ghirardelli, ScharffenBerger, and Valhrona.
These cookies are dense, gooey, and intensely chocolatey. The white chocolate chips provide a startling contrast to the richness of the dark chocolates. I used dried apricots and pecans in the recipe, but next time I might try craisins like Brilynn did over at Jumbo Empanadas. At My Feasts, Maya used raisins and pecans. I don’t like cookie dough (I know, weird), but I had to restrain myself from eating this batter out of the bowl – that’s how good it was.
A few final thoughts. I thought that the apricots were a tad bitter, so I’m going to try another fruit next time. I also think these cookies are not particularly kid friendly (especially with the apricots), unless the child in question has a taste for something other than milk chocolate. Finally, don’t make the cookies too small. I found that a golf-ball sized blob of dough gave me a lot of cookies, yet maintained the gooey consistency inside.
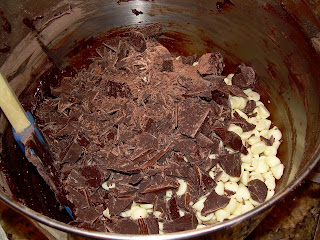 Now THIS is chocolate cookie dough!
Chocolate Chunkers
Adapted from a recipe in Baking: From My Home to Yours
1/3 cup all purpose flour
¼ cup unsweetened cocoa powder (I used Droste Dutch processed cocoa)
½ tsp. salt
¼ tsp. baking powder
3 tablespoon unsalted butter – cut into pieces
6 oz. bittersweet chocolate, coarsely chopped (I used Valhrona)
2 large eggs (at room temperature)
2/3 cup sugar
1 tsp. vanilla extract
6 oz. semisweet chocolate, chopped (I used Scharffenberger)
6 oz. white chocolate, chopped (I used Nestle’s white chocolate chips)
1 ½ coarsely chopped nuts ( I used pecans)
1 cup dark or golden raisins, plump dried apricots, or another dried fruit that you like.
Center rack in the oven and preheat oven to 350 degrees F. Line 2 baking sheets with parchment paper or silicon mats (don’t skip this step).
Sift together flour, cocoa, salt and baking powder. Melt butter with unsweetened and bittersweet chocolate in a heatproof bowl over a saucepan of simmering water. The chocolate should be smooth and shiny. Set on counter to cool.
 Beat eggs and sugar on medium high speed until mixture is pale and foamy. Reduce speed, add vanilla. Then add cooled melted chocolate, and mix only until incorporated. Add dry ingredients. Do not over mix. Dough will be thick and shiny. Try not to eat all the dough out of the bowl.
Add semisweet and white chocolate chunks, nuts, and raisins. Drop dough onto baking sheets, making each cookie about the size of a golf ball. Leave an inch between dough. Bake for 10-12 minutes, but start to check your cookies at about 7-8 minutes. It’s very hard to tell if a chocolate cookie is “done,” and burned chocolate tastes terrible. Dorie recommends baking until the “tops of the cookies look a little dry.”
Cool cookies. These freeze very well.
I found this tip on A Merrier World, via Rose Levy Berenbaum’s blog. This may be helpful to those of you living outside of the United States, where you may not have access to bleached flour. Thanks to Kate from A Merrier World for her discovery:
For those of you around the world who do not have access to the wonderful bleached flour available in the US (such as Gold Medal) necessary for the best texture and flavor in butter layer cakes, Kate has been doing some astonishing work using the microwave to ‘heat treat’ the flour, enabling it to gelatinize in much the same way that bleaching accomplishes. (Source).
30
Dec
 Even though I didn’t participate in December’s Daring Bakers Challenge, I have been baking up a storm. Baking my least favorite things to bake, cookies.
This year, I decided to take the bull by the horns and pretty much jettisoned virtually every cookie I had baked previously, with a couple exceptions. Those exceptions were due to great taste, in the case of my mother-in-laws bourbon balls, and emotional appeal, in the case of Hershey’s peanut blossom cookies.
The first cookie I decided to test was a butter cookie. I pulled the recipe from an add for Kerrygold Pure Irish Butter that I found in a recent issue of Gourmet magazine. Instead of Kerrygold, I used an Icelandic butter that I had purchased at Whole Foods, and that I needed to use up.
The butter was amazing – the texture was like cutting into a soft cheese or a fudge. The flavor was clean, with no aftertaste. And it produced the best butter cookie that I have ever made. Ever.
 Butter cookies and shortbread are my favorite cookies. They are simple, satisfying, and melt in your mouth. When the butter you have used is top quality, that is. Some folks are very sensitive to the flavors in coffee, or cabbage, or wine. In my case, I can really taste when the oil in fats or nuts is even slightly off.
I will make these again, and again, and again. But using only a great European butter. I’ve tried butter cookies with Plugra brand, and while they were good, they were not outstanding.
And if you’re wondering what the little pink dots are in the middle of some of the cookies, they are pink peppercorns. When you bite into them, you get a jolt of a vibrant, flowery flavor, not any heat. I took a cookie making class with Betsy Cukla of Hammersong (a great cookie cutter manufacturer) at La Cuisine a couple years ago, and that was something that she taught us. If you freeze the cookies after baking them, keep them in their own individual container so that they don’t pick up other cookie flavors.
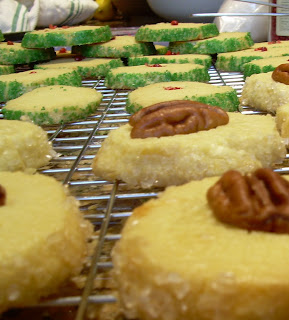 Elinor Klivans’ Slice and Bake Butter Cookies
Pastry chef and cookbook author, Elinor Klivans, developed this crisp and buttery cookie recipe for Kerrygold Pure Irish Butter. Adapted from an ad in Gourmet Magazine, 2007.
2 cups unbleached all-purpose flour
½ teaspoon baking powder
¼ teaspoon salt
1 package (8 ounces or 1 cup) salted Kerrygold Pure Irish Butter, at room temperature, or another premium European butter
2/3 cup granulated sugar
2 large egg yolks, at room temperature
1 teaspoon vanilla extract
1 large egg white
1/3 cup granulated sugar or coarse sugar crystals for rolling the cookie log
Pecan halves, walnut halves, or pink peppercorns (optional)
Sift flour, baking powder and salt into medium bowl and set aside. In large bowl beat butter and sugar until lightened in color and fluffy, using an electric mixer on medium speed, about 2 minutes. Mix in egg yolks and vanilla. Add flour mixture, mixing on low speed just until flour is incorporated and soft, smooth dough forms. Do not over beat, or you will have a tough cookie.
Divide dough into 2 pieces; form each into a log about 7 ½ inches long and 1 ½ inches in diameter. Wrap each in plastic wrap. Refrigerate about 1 hour until cold and firm, or overnight. I chilled mine overnight, which is longer than I’d chilled cookie dough before, and it made a big difference in maintaining the shape of the log later on as I cut the cookies. Or freeze, wrapped securely, for up to 1 month. (Defrost in the refrigerator before slicing and baking.)
Position rack in middle of oven. Heat oven to 325° F. Line two baking sheets with parchment paper. In small bowl, use fork to beat egg white until foamy, about 30 seconds. Use pastry brush to brush each log with egg white. Sprinkle the 1/3 cup sugar on strip of wax paper then roll each log back and forth in sugar to coat lightly. Use large sharp knife to cut each log into ¼-inch-thick rounds. Place 1 inch apart on prepared baking sheets. Press nut half or peppercorn into each cookie before baking, if desired. Bake one sheet at a time until cookie edges and bottoms are light brown, about 18 minutes, but start checking on your cookies before then, at about 10 to 12 minutes. Cool 5 minutes on baking sheet, then transfer to wire rack to cool completely. Store in tightly covered container at room temperature up to 3 days, or freeze.
Makes 40-60 cookies.
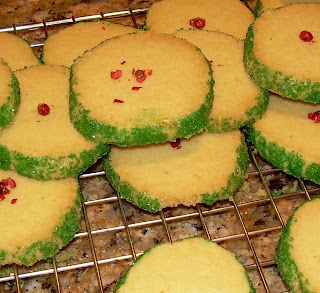
30
Dec
 When you chop nuts or chocolate, do you find that the pieces jump off your cutting board? You can always place the items to be chopped in a plastic bag or kitchen towel, and then whack it with a rolling pin. But what if you don’t want to do that?
A few years ago, I read a tip that I’ve used successfully ever since: use two chef’s knives simultaneously to chop. It really works! And if you’re wondering what’s all over my knives, I’ll have you know it’s chocolate and butter. Yum.

30
Dec
 I was not able to participate in this month’s challenge, but be sure to check out the Daring Baker’s blogroll to view the beautiful Yule Logs!
And a very Happy New Year to everyone!
 Someone around here has the good sense to take a nap.
Like many of you, I’m busy cooking, cleaning, baking, decorating, etc. My least favorite thing to bake are . . . cookies. Yep, cookies. And I’m baking dozens of them. I realized that I was bored out of my gourd baking the same old things every year, many of which I never really liked. So this year I decided to shake things up a bit. I’ll be posting about that later, but take a hint: if you haven’t baked Dorie Greenspan’s Chocolate Chunkers from her marvelous book,Baking: From My Home to Yours
Because I had Dorie on my mind, I decided to take a long overdue cruise to her blog, and discovered a link with her suggestions for gifts for the cook. Homesick Texan has a post on her suggestions for gifts from Texas, including Dr. Pepper made with real sugar, not corn syrup.
I have a few suggestions myself:
(1) a Microplane Grater/Zester
(2) a gift certificate to Penzey’s, a great resource for spices, herbs, and rubs
(3) Chicago Metallic Professional 8-inch Round Cake Pan
(4) Pralus Infernale Bar, a chocolate bar filled with the most exquisite gianduja
(5) Slitti Nocciolata, which makes Nutella taste like old wax. I have to restrain myself from eating it out of the jar with a spoon, and I must say, I do not succeed.
(6) a Le Creuset Dutch oven, one at least 7-1/4 quarts.
(7) a heat resistant silicon spoonula, such as this one from Le Creuset, which is what I use every day.
(8) a set of Boyajian’s citrus oils
(9) a baking stone
And finally, for the baker in your life, who needs something more powerful than a KitchenAid, there’s always:
(10) a 5 qt. Hobart mixer. You can always go bigger, of course.
Now, I think I’ll join the pups for a nap!
Bad Behavior has blocked 4111 access attempts in the last 7 days.
 Powered by FireStats

