


A group of food bloggers has come together to bake something each week from Dorie Greenspan’s wonderful book. If you want to see their latest creation, go check out the blogroll!

12
Feb
A group of food bloggers has come together to bake something each week from Dorie Greenspan’s wonderful book. If you want to see their latest creation, go check out the blogroll!


11
Feb
 Tartelette and Peabody are hosting a donut blogging event on February 13, which gave me the perfect excuse to use up a big jug of oil that I had purchased last year so I could make . . . donuts. Only I didn’t make them. I was too busy baking a ridiculous amount of cookies for Christmas.
 After consulting with Master Chow, I decided to make cake donuts, because they are his favorite. I found a recipe that, surprisingly, required no yeast, in Beatrice Ojakangas’ book,Great Old Fashioned American Desserts
This time, I told myself, I’m going to get everything ready. I’m going to be organized, efficient. No goof-ups. And then I discovered that I was OUT of all-purpose flour. Yes, a Daring Baker, out of flour. I have about ten different types in my freezer, but you do not make cake donuts with garbanzo flour. Or barley flour. So I had to resort to my bread flour. Therefore, I can now tell you not to use bread flour for donuts – they still taste great, but they sure are heavy. I made a couple other changes to the recipe: I increased the amount of nutmeg from 1/4 t. to a 1/2 t., and instead of vanilla extract, I added a full teaspoon of Buttery Sweet Dough Flavor, which gave the donuts that unique bakery flavor.
It’s hard to go wrong with fried dough – people the world over just love this combination, so I encourage you to give a donut recipe a try!
In a large mixing bowl, combine the dry ingredients (except the ingredients that you will use to dust the donuts). Combine the wet ingredients (except the oil for frying) in a large measuring cup. Stir the liquid ingredients into the dry ingredients, just until the dry ingredients are moistened. Knead dough briefly until it loses its stickiness. I found it helpful to refrigerate the dough for an hour before rolling and cutting, but the recipe doesn’t require you to do so.
Make sure you have 2 to 3 inches deep of oil in a heavy pan. Preheat the frying oil to 375 F. Roll out the dough about 1/2 inch thick, and cut out with a floured donut cutter. Be sure to make that center hole big enough, or it will close up when you fry the donut. Carefully transfer the donuts, just a few at a time, to the hot oil. Fry them for about a minute on each side, until a deep golden brown. Set aside to drain, then dust in cinnamon sugar or powdered sugar.
P.S. You can find Beatrice Ojakangas’ book for a great price over at Jessica’s Biscuit.
7
Feb

Head on over to Rose Levy Beranbaum’s blog for her wonderful citrus curd recipe, plus a source for those bitter Seville oranges with which to make marmalade (I’ve already ordered some, and plan on using Elise’s recipe to make a large batch). Rose notes that “Seville orange are also known as bitter oranges because they have an acidity level of about that of lemon. They offer the true orange flavor of a sourball candy and will give you the consistency of a perfect lemon curd, unlike that of other oranges which don’t thicken adequately.” Rose also shares this fantastic curd-making tip: “if you beat the butter into the eggs and sugar before adding the juice it protects the yolks from curdling at all so you get 0 residue!”
 Feeling overloaded and bloated from all the baked goods and sweets that have been making frequent appearances in my life ever since Thanksgiving, I felt the need for something light, refreshing, and healthy. So, I pulled out my July 2007 issue of Bon Appetit, and decided to whip up a batch of Cabbage and Corn Slaw with Cilantro.One of the things that appealed to me about this recipe was its lack of mayonnaise. I wanted something that I could fill up on, and not have an iota of guilt over what I had just eaten. I had all of the ingredients on hand, except frozen orange juice, and coleslaw mix. So, I shredded up my own cabbage mix, and used Dole brand Pineapple-Orange-Banana frozen juice concentrate. Believe it or not, it tasted great!
Cabbage and Corn Slaw with Cilantro
Adapted from a recipe by Pam Anderson in Bon Appetit, July 2007
1/3 cup frozen pine-orange-banana juice concentrate, thawed
2 T. fresh lime juice
1/3 cup unseasoned rice vinegar (this can be rather hard to find – this is rice vinegar that does not contain sugar. If you can find only seasoned rice vinegar, increase the lime juice to taste)
1/3 cup olive oil
1/2 head of purple cabbage (about 8 oz.), shredded
1/2 head green cabbage (about 8 oz.), shredded
2 large carrots, grated
2 cups of frozen corn
1 medium red bell pepper, stemmed, cored, cut into thin strips
6 medium green onions, thinly sliced
1/2 cup chopped fresh cilantro
kosher salt and pepper to taste
Whisk orange juice concentrate, lime juice, rice vinegar, and olive oil in small bowl. Season with salt and pepper. Dressing can be made 1 day ahead. Cover and refrigerate.
Combine cabbage, corn kernels, carrots, red bell pepper strips, sliced green onions, and chopped cilantro in large bowl. Toss with enough dressing to coat. Season slaw to taste with salt and pepper. Let stand 15 minutes for flavors to blend. Toss again and serve.
4
Feb
 Daisy and Gus, snoozing in a comfy lap
 These cookies are amazing. Master Chow loves peanuts and peanut butter, but he often avoids peanut cookies because they taste like peanut brittle, which he does not like. Personally, I like all of the above. A bit too much, perhaps. Last year, in a radical shake-up of my eating habits, I decided to measure out what I was eating: my “one tablespoon of peanut butter” was actually
  more like two. Or three. Master Chow goes through an alarming amount of peanut butter, which he mixes into his oatmeal. Yes, it’s really, really good.
Needless to say, we are a peanut-loving family. These cookies leave every peanut/peanut-butter cookie that I have ever tried in the dust. I want to make them again, and soon. Unfortunately for me, Master Chow and I both have Major Reunions coming up this summer, and I have to exercise some self-discipline. Besides, I’m going to be making doughnuts soon!
The recipe comes from Tish Boyle’s wonderful book,The Good Cookie: Over 250 Delicious Recipes from Simple to Sublime
 Crunchy Peanut Bars
Adapted slightly from The Good Cookie: Over 250 Delicious Recipes from Simple to Sublime
Brown sugar crust:
1 1/4 cup all-purpose flour
1/2 teaspoon salt
1/2 cup (1 stick) unsalted butter, softened
1/2 cup firmly packed light brown sugar
Peanut topping:
4 tablespoons (1/2 stick) unsalted butter
2/3 cup light corn syrup
1 2/3 cups (10 ounces) peanut butter chips
2 teaspoons vanilla extract
2 1/4 cups (12 ounces) salted peanuts
To make the crust:
1. Position a rack in the center of the oven and preheat the oven to 350F. Line a 9 by 13 inch baking pan with foil, then grease the foil.
2. In a medium bowl, stir together the flour and salt, set aside.
3. In the bowl of an electric mixer, using the paddle attachment or beaters, beat the butter with the brown sugar at medium speed until combined, about 1 minute. At low speed, add the flour mixture and mix just until crumbly, 10 to 15 seconds.
4. Pat the dough into the bottom of the prepared pan. Prick the dough well with a fork. Bake the crust for 15 to 18 minutes, until golden brown around the edges. Transfer the pan to a wire rack to cool while you prepare the topping. Leave the oven on.
To make the topping:
5. In a large saucepan, combine the butter, corn syrup, and peanut butter chips and heat over medium heat, stirring constantly, until the chips are melted and the mixture is smooth, about 5 minutes. Remove the pan from the heat and stir in the vanilla extract.
6. Pour the topping over the crust, using a spatula to spread it to the edges of the pan. Sprinkle the peanuts evenly over the topping, and press them lightly into the topping. Bake the bars for 12-15 minutes, until the topping is bubbly. Cool the bars completely in the pan on a wire rack.
7. Lift the entire foil sling carefully out of the pan. Alternatively, lay a cutting board across the pan, and flip the pan over so that the entire slab of cookies is upside down on the cutting board. Place another cutting board across the cookie slab, then flip it over again, so that it is right-side up. Using a sharp knife, cut into 36 bars.
These cookies keep for about 5 days at room temperature in an airtight container, and for a couple months if you freeze them. If you freeze, don’t put other cookies in the same container or the flavors will mix.
 Jen, of the Canadian Baker, masterminded this month’s challenge – Lemon Meringue Pie! As I’ve noted before, I am a sucker for citrus, and I was thrilled by this months challenge because it gave me an opportunity to use the Meyer lemons from my little Meyer lemon tree:
 The very first pie I ever made was a lemon meringue pie: I was twelve years old, and my mom let me plan and make a meal for the family, all by myself. I made a roast chicken, twice-baked potatoes, and a lemon meringue pie. I have to tell you, much to everyone’s surprise, that pie was perfect. And it tasted good, too.
 Other than the curd, I think my favorite part of the recipe was the all butter crust – it was easy to work with, very crispy, and was still crisp the next morning. I know, because I had a piece of pie for breakfast. But I wouldn’t use this crust on a lemon meringue pie again – I think it would be better in a really sweet pecan pie, or maybe even a pot pie of some sort.
Lemon Meringue Pie can be quite challenging for those who have not baked much: you have to work with a pastry crust, make a meringue, and temper eggs for the filling. While the recipe called for putting the cooled filling in a cool cr ust, and then instructed us to top the cooled curd with meringue, I’ve learned from sad prior experience to put the meringue on a HOT filling. This helps cook the bottom of the egg whites, and reduces the amount of clear fluid that builds up between the curd and the meringue (known as “weeping”.)
I don’t know that I would put this particular recipe on the repeat list, but I’m so glad that Jen picked this for January’s Challenge. If you want to see and learn more, go over to the Daring Baker’s Blogroll. And for the recipe, be sure to check Jen’s site. I can hardly wait for the next challenge!
 Usu
Usu ally when I make oxtail soup for Master Chow, I do it Italian-style, meaning I use Italian herbs, tomatoes, etc. This time, I decided to shake things up a bit and throw in some Asian elements, and found inspiration over at Simply Recipes and The Scent of Green Bananas.
When it’s cold outside, (and inside – we keep the house at around 58 degrees F), a warm bowl of soup, a salad, and some nice crusty bread make a wonderful meal. This month’s Monthly Mingle’s topic is, appropriately, “comfort foods.” Oxtail soup is very popular in Hawaii, parts of Latin America, Spain, and Italy, and Master Chow is quite fond of it. Back in the old days, oxtails were quite inexpensive, but now they are pricey, indeed. When I find them on sale, which is hardly ever, I pounce, and whip up a big pot of soup for Master Chow.This recipe provides a rough guideline of what I do – every time I make the soup, I change things a bit, including the seasonings. It all depends upon what I have on hand, and my mood. The key is to taste as you go along, and adjust the flavorings to suit your palate.
Oxtail Soup
5-6 lbs oxtails
2 Tbsp. toasted sesame oil
kosher salt and pepper
Coat the oxtails in the sesame oil, plus some salt and pepper, and marinate for two hours.
1 large yellow onion, chopped (about the size of a softball)
2 large carrots, diced
2 large celery stalks, diced
5 lemongrass stalks, tender bottom part only, cut and crushed
1 piece fresh ginger (approx. 3-inches), thinly sliced
1/4 cup tomato paste
1 1/2 teaspoons Thai red chili paste
8 cloves of garlic, minced
2 cups of red wine
2 star anise
3 bay leaves
4 cups beef stock
2-4 cup water
kosher salt and pepper, to taste
Vegetable oil
To garnish: chopped green onions, mushrooms, lime wedges, cilantro.
This recipe takes two days, so plan ahead!
Preheat the oven to 300 degrees F.
Pour some vegetable oil into a large Dutch oven (I used a 12 qt.), enough to coat the bottom. Brown the oxtails in batches (don’t crowd the pan), and set aside. You want about 1/4 cup of oil in the bottom of the pan before you go on to the next step, so pour off any excess, or add some more oil if you need it.
On medium low heat, add the onion, carrots, celery, ginger, lemongrass, tomato paste, and Thai red chili paste. Cook until the onions are translucent, but watch the pot carefully – if things get too hot, turn down the heat. Add the garlic and saute briefly.
Deglaze the pan with the red wine, and cook for about 5-8 minutes, or until the wine is reduced by about half. Add the star anise, bay leaves, beef stock, salt and pepper, and enough water to just cover the oxtails.
Lay a piece of foil or parchment across the opening of the pan, then push down gently so that the parchment or foil is just about the surface of the stew, but does not touch it. Cover with the lid, place it in the oven, and cook for about 3-4 hours, or until the meat is falling off the bones.
Remove from oven, and place the meat in a separate container. Refrigerate the broth and meat overnight. The next day, skim the fat off the surface of the broth – it’s a lot easier to do this if you don’t have to work around all the chunks of meat. Return the meat to the broth, and heat through. Serve with chopped cilantro, mushrooms, lime wedges, and/or chopped green onions
Serves 8.
23
Jan
 As I’ve mentioned before, one of my favorite food magazines is Fine Cooking. During a recent visit with my auntie, she said that what sets this magazine apart is that she saves the entire issue. When it comes to other cooking magazines, she tears out pages that interest her, and she tosses the rest of the magazine.
Well said.This past Thanksgiving, I decided to add a chocolate pecan pie to the menu, in addition to my favorite pecan pie. I’m just getting around to posting about it now, in part because the making of said pie was traumatic:
 Yes, that’s my homemade tart shell on my kitchen floor. This is why I have commercial crust back-ups in my freezer. The pie weights left dents all over the bamboo – it looks like someone shot it up with a BB gun. But I’ll deal with that at some point in the future!
 Rose’s tart on the left, chocolate espresso tart, in production, on the right
So, I used a Pillsbury pie crust for a recipe by pastry chef Karen Barker in Fine Cooking’s issue #88. Boy, this is one rich, sweet, fudgy pecan pie. Too sweet, I thought, but I noticed an odd thing: folks would take a small bite and, overwhelmed by the richness of the pie, they would set it aside. And then come back for another bite. And another. Hhm. I guess some folks like really sweet, chocolatey pecan pie. Imagine that!
I’ve tweaked the recipe a bit to tone down the sweetness, but trust me, it will still be very sweet. And do not be tempted to use anything but unsweetened chocolate, or your teeth will ache!
The original recipe used corn syrup and a cup of sugar.
Chocolate Espresso Pecan Pie
Adapted from a recipe by Karen Barker, in Fine Cooking #88
One 9-inch pie crust, homemade or purchased, and blind-baked until a light golden brown
For the filling:
To make the filling:
Melt the chocolate and butter in the microwave or in a small metal bowl set in a skillet of barely simmering water, stirring with a rubber spatula until smooth. Set aside and allow mixture to cool slightly
In a medium mixing bowl, whisk the eggs, Lyle’s golden syrup, sugar, and salt. Dissolve the instant espresso in 1 Tbs. hot water and add to the egg mixture, along with the coffee liqueur and the melted chocolate and butter. Whisk to blend.
Evenly spread the toasted pecan pieces in the pie shell. To form a decorative border, arrange the pecan halves around the perimeter of the pie shell, on top of the pecan pieces, keeping the points of the pecans facing in and the backs just touching the crust. Slowly and carefully pour the filling into the center of the pie plate and over the pecans until the shell is three-quarters full. Pour the remaining filling into a liquid measuring cup or small pitcher. Transfer the pie to the oven and pour in the remaining filling. (The pecans will rise to the top as the pie bakes.)
Bake the pie until the filling puffs up, just starts to crack, and appears fairly set, 45 to 55 minutes. Transfer it to a rack and allow it to cool completely (at least 4 hours) before serving. The pie is best if you refrigerate it overnight – the filling sets and the flavors develop.
 Candy Recapper is hosting this month’s Sugar High Friday. The theme? Why candy, of course! In my first official foray into SHF, I present to you, Peanut Blossom cookies, garnished with Hershey’s chocolate kisses. Little kids just love these, so if you have young ones who are free of chocolate or peanut allergies, definitely give these a try, if you haven’t done so already.
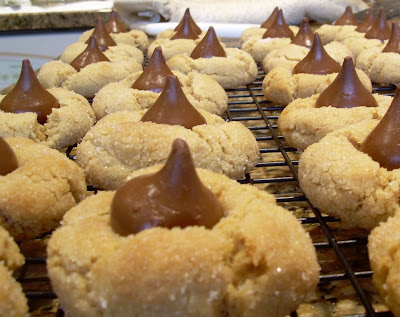
Peanut Blossom Cookies
Adapted from Land O’Lakes
Preparation time: 45 min Baking time: 8 min
Yield: 4 dozen cookies1/2 cup sugar
1/2 cup firmly packed light brown sugar
1/2 cup unsalted butter, softened
1/2 cup peanut butter (not the health food kind)
1 egg
1 teaspoon vanilla extract
1/4 teaspoon salt
1 3/4 cups all-purpose flour
1 teaspoon baking soda
1/4 cup sugar
48 milk chocolate candy kisses, unwrapped
Heat oven to 375°F. Combine 1/2 cup sugar, brown sugar, butter and peanut butter in large bowl. Beat at medium speed until light and fluffy. Add egg, vanilla and salt; continue beating until well mixed. Add flour and baking soda. Continue beating, scraping bowl often, just until well mixed. Shape dough into 1-inch balls. (If dough is too soft, refrigerate 30 to 60 minutes.) Roll balls in the 1/4 cup sugar. Place 2 inches apart onto ungreased cookie sheets. Bake for 8 to 10 minutes or until very lightly golden brown. Immediately press 1 chocolate kiss in center of each cookie. Remove from cookie sheets; cool completely on wire racks.

Nutrition Facts (1 cookie): Calories: 100, Fat: 5g, Cholesterol: 10mg, Sodium: 70mg, Carbohydrates: 12g, Dietary Fiber: 0g, Protein: 2g
© 2001 Land O’Lakes, Inc.
Update: As I noted in the comment section, refrigerating this dough really helped reduce spread. I made a similar recipe at Christmas, but it used shortening instead of butter, and the taste just wasn’t the same. If you still have trouble with cookie spread after working with cold dough, reduce the butter to 1/4 cup and use 1/4 cup of butter flavored Crisco. That will help, and the taste will still be very good!
Bad Behavior has blocked 4113 access attempts in the last 7 days.
 Powered by FireStats
