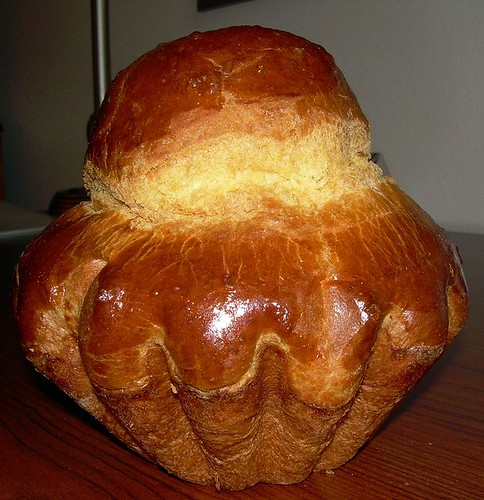
I just returned from the one week long Advanced Bread Baking course with Certified Master Baker Jeffrey Hamelman at King Arthur Flour (KAF) in Norwich , Vermont. How was it?
FABULOUS.
The last couple years have been exhausting in a number of ways, with lots of travel and caring for an ill family member. My husband recommended a vacation. For some reason , I just wasn’t interested. But I kept going back to the class offerings at KAF, and they REALLY interested me.
I met all sorts of wonderful people; some were in second or third careers, some were thinking of launching their own bakeries, and all of us were enthusiastic and eager to learn, and learn we did. Over the next couple weeks, I’ll be posting about all the wonderful breads and pastries that we made,but I’ll start with the brioche.
I’ve made a lot of brioche, but never Brioche à tête because I was intimidated by the shaping. Thanks to Chef Hamelman, I was able to produce a decent looking brioche, albeit a bit top heavy. I named her Dolly Parton. I’m not posting the recipe because we were baking in professional quantities, but any good brioche recipe will work for you.
Some tips:
- weigh your ingredients, including the eggs (Dorie’s recipe in the link above doesn’t have weights, but it works)
- develop the gluten in the dough until it “sheets” and you get a really good windowpane
- keep the dough cold.
- don’t drown the dough in flour when shaping, but keep your HANDS well floured the whole time so that you don’t rip the dough ball
- when you are making a hole for the top knot, push all the way down to the bottom of the pan and make sure that the circle of dough surrounding the hole is of even diameter all the way around so that the brioche rises and bakes evenly
- with dry, floured hands, really push that top knot into the hole, pushing until you feel the bottom of the pan
- with a pair of scissors, make about five slashes evenly around the periphery of the brioche, right next to the edge of the pan, before the final proof.
- the brioche in the picture above is NOT burned – that is the color you should get if you are using 100% butter. Dark is good.
- this is important: to test to make sure your brioche is done, remove it from the pan and feel the sides of the loaf. Are they soft and giving, even if they look brown? If yes, the bread is NOT finished baking. Return it to the pan and the oven and check again in a few minutes. Why? If the sides are not baked firmly, the gluten structure will collapse and you will get an “hourglass” effect instead of the structured sides you are looking for.
Stay tuned for more posts on what I learned. I came home with over 100 pounds of flour, so I anticipate that my bread baking obsession will be well nurtured for the foreseeable future. And be sure to check out Susan’s weekly roundup called Yeastspotting!


Related Articles
9 users responded in this post
So glad you enjoyed your class here! I hope it was just the break you needed. We look forward to reading more about it- Allison@KAF
[…] Brioche à Tête with Jeffrey Hamelman […]
I did, and I look forward to taking more classes! Thank you so much for the wonderful hospitality.
WOW! How wonderful to be able to take a class from a master and then post such a mouthwatering tower of deliciousness. Beautiful looking brioche.
Oh I am jealous! I would so love to take a class like that, and your brioche is gorgeous.
Incredible!! Both the brioche AND getting to go to the class!!!
This is really gorgeous, perfect.
Your tips sound wonderfully helpful, many thanks.
[…] promised, here is another entry about my advanced baking class at King Arthur Flour. In keeping with my previous post about brioche, I thought I’d show you a couple more items […]
THAT is a gorgeous brioche. Wow!!
And some great tips. Thanks.
[…] bread baking class. I’ll be posting more about it, but you can read my two previous posts here and […]